Showing posts with label windows install. Show all posts

Tuesday, November 4, 2025

Clear Start Menu Pinned Items

I haven't used this yet but plan to on the next Win 11 implementation.
The .bat file to run the .ps1
Paste the following into a notepad and save as Run-Clear-StartMenu.bat

@echo off

:: ============================================================================
:: Self-Elevation Section: Check for Admin rights and relaunch if needed.
:: ============================================================================
fsutil dirty query %systemdrive% >nul
if %errorlevel% neq 0 (
    echo Requesting administrative privileges...
    powershell.exe -Command "Start-Process '%~f0' -Verb RunAs"
    exit /b
)

:: ============================================================================
:: Main script execution (only runs if we have Admin rights).
:: ============================================================================
TITLE Running PowerShell Script (As Administrator)

REM The core command:
powershell.exe -NoProfile -ExecutionPolicy Bypass -File "%~dp0Clear-StartMenu.ps1"

echo.
echo Script has finished.
pause

@echo off
REM This batch file will execute a PowerShell script without permanently changing the Execution Policy.

REM Set the title of the command window for clarity.
TITLE Running PowerShell Script...

REM The core command:
powershell.eXE -NoProfile -ExecutionPolicy Bypass -File "%~dp0Clear-StartMenu.ps1"

REM Pause to see the output. Remove this line if you want the window to close automatically.
echo.
pause

The .ps1 script to clean the pinned items
Paste the following into a notepad and save as Clear-StartMenu.ps1

<#
.SYNOPSIS
    Unpins the default "bloatware" and common apps from the Windows 11 Start Menu.
    This script is safe to run multiple times. It only acts on items that are currently pinned.
.DESCRIPTION
    The script gets a list of all items pinned to the Start Menu. It then compares that list
    against a customizable array of app names ($appsToUnpin). If a match is found, it
    programmatically invokes the "Unpin from Start" verb, effectively right-clicking and
    unpinning it for you.
.NOTES
    Author: Community-Sourced (refined for clarity)
    Run this in a PowerShell 7 Terminal (Admin) for best results.
#>

# --- EDIT THIS LIST ---
# Add or remove app names to control what gets unpinned.
# You don't need the exact name, a unique part of it is usually enough (e.g., "Xbox" instead of "Xbox Game Bar").
$appsToUnpin = @(
    "Microsoft Edge",
    "Mail",
    "Calendar",
    "Microsoft Store",
    "Photos",
    "Your Phone",
    "Xbox",
    "Get Help",
    "Tips",
    "Solitaire",
    "Spotify",
    "Netflix",
    "Prime Video",
    "TikTok",
    "Instagram",
    "Facebook",
    "Messenger",
    "Movies & TV",
    "Weather",
    "Clock",
    "To Do",
    "Whiteboard",
    "Clipchamp",
    "Family",
    "Cortana"
)

# You can also unpin useful tools if you want a completely blank slate.
# To do this, uncomment the line below by removing the '#' at the beginning.
# $appsToUnpin += @("File Explorer", "Settings", "Calculator", "Notepad", "Paint")

# --- SCRIPT LOGIC (No need to edit below here) ---
Write-Host "Attempting to unpin default Start Menu apps..." -ForegroundColor Cyan

try {
    # This is the magic command to access the Start Menu's pinned items folder.
    $startMenuPins = (New-Object -ComObject Shell.Application).NameSpace('shell:::{4234d49b-0245-4df3-b780-3893943456e1}').Items()

    if (!$startMenuPins) {
        throw "Could not access the Start Menu pinned items."
    }

    # Loop through each app name in our list.
    foreach ($appName in $appsToUnpin) {
        # Find the corresponding pinned item. The wildcard '*' helps match partial names.
        $itemToUnpin = $startMenuPins | Where-Object { $_.Name -like "*$appName*" }

        if ($itemToUnpin) {
            # Find the "Unpin from Start" action for that item.
            $unpinVerb = $itemToUnpin.Verbs() | Where-Object { $_.Name -eq "Unpin from Start" }

            if ($unpinVerb) {
                # Execute the action.
                $unpinVerb.DoIt()
                Write-Host "  [SUCCESS] Unpinned '$($itemToUnpin.Name)'" -ForegroundColor Green
            }
        }
        else {
            # This part is just for information, it will show which apps were not found (likely already unpinned).
            # Write-Host "  [INFO] '$appName' was not found or already unpinned." -ForegroundColor Gray
        }
    }
    Write-Host "Script finished." -ForegroundColor Cyan
}
catch {
    Write-Host "An error occurred: $($_.Exception.Message)" -ForegroundColor Red
}

Wednesday, October 2, 2024

Windows 11 Install - Recent

If you need a copy of Windows don't forget UUdump.

Set up with a local account. My list of ways is here.
Set up for work or school. Any domain name works.
    Works on Pro
or

Rufus is also a good option and it allows user name input during the install

Installing starts
First reboot 79%
Second reboot 62%
"Just a moment..."
Yes, Yes, Skip
"Let's connect you to a network"
shift + f10
oobe\bypassnro
"Just a moment..."
reboot
"Just a moment..."
Yes, Yes, Skip
"Let's connect you to a network"
click "I don't have internet"
Name
Next "blank password" set up later
No to everything
Accept
Hi

sysdm.cpl advanced>performanc>settings turn off everything that moves, fades or slides
indexing options remove everything except start menu

cmd
winget upgrade
to get list - then likely these need upgrading - ignore the others
winget install Microsoft.AppInstaller
winget install Microsoft.WindowsTerminal
winget install Microsoft.VCLibs.Desktop.14

winget install -e --id=RevoUninstaller.RevoUninstaller
 remove some stuff you don't like or need

Chris Titus WinUtil
  powershell admin
    irm christitus.com/win | iex
      standard tweeks, updates security, create shorcut

paste in notepad
  save as "somename.bat"
    right click, run as admin

---
winget install -e --id=Notepad++.Notepad++
winget install -e --id=Chocolatey.Chocolatey
winget install -e --id=Chocolatey.ChocolateyGUI
winget install -e --id=MartiCliment.UniGetUI
winget install -e --id=7zip.7zip
winget install -e --id=voidtools.Everything
winget install -e --id=ShareX.ShareX
winget install -e --id=winaero.tweaker
winget install -e --accept-package-agreements --id=9PF4KZ2VN4W9
winget install -e --accept-package-agreements --id=9P8LTPGCBZXD
pause
---

cmd
choco install launchyqt -y

Remember to:
sysdm.cpl > Advanced > Performance > turn off Animate, Fade, Slide
indexing options > leave only Start Menu

What about that Schneegans autounattended.xml?

Here we go . . .
    with aggressive app removal

create autounattended.xml
    If on Virtualbox
        start Anyburn edit win-iso and add autounattended.xml > rebuild > save
    If on hardware
        copy autounattended.xml and Win.iso to flash drive installer.

Start Install
"We are getting a few things ready"
Choose drive
"Installing Windows"
78% reboot #1
"Installing"
58% starts running powershell scripts
reboot #2
"Just a moment"
Holly Hanna!
"Checking for updates"
"Hi"
More powershell magic being run
    The programs were uninstalled but the shortcuts are still on start
Yikes, I can't log on . . .
OK, I intended to have a blank password but left the default "password" in xml file.
So, "password" it is then :)
Remember to delete "password" in the autounattended file if you want "blank" :)


Strange:
    Some Win.iso versions won't pick up the inserted autounattend.xml on VB

Too Much? :)


Thursday, August 29, 2024

Powershell Unrestricted and Download Windows ISO

Forget Windows Media Creation Tool. Download the Windows version you want.

Download the Fido.ps1 script here. Rufus uses it.
Open Powershell and type Get-ExecutionPolicy -List
You probably see this

We just want to run Fido.ps1 once and not change powershell policy forever.
You can use CMD or Powershell
> Of course change "username" and assuming Fido is located in Downloads<

Powershell.exe -ExecutionPolicy Unrestricted -File C:\Users\"username"\Downloads\Fido.ps1
>Remember shift+right-click and copy as path works<

Now when you close Powershell, nothing has changed.

The same thing can be done with Rufus to just grab the Windows.iso but it's not intutive.
In Boot selection choose Non bootable. Then click the down arrow by Select and choose DOWNLOAD. Then click DOWNLOAD
After downloading close Rufus


Saturday, November 4, 2023

Windows 11 Install "First Things"

Windows 11 Installation Guide: First Things to Do

Getting the Windows ISO

Grab an official Windows ISO.
    I get Win11 from here today . . . or here . . . tomorrow, who knows.
        Or this is interesting for unsupported hardware https://github.com/AveYo/MediaCreationTool.bat
            Run as Admin
                Worked for me on VM Win11 23H2 4GB RAM & no TPM

Install

    Install Ventoy onto a USB stick.
    Go HERE and create an autounattended.xml file & download the file.
    Paste the Windows ISO & autounattended.xml onto the Ventoy drive.
    The autounattended.xml need not be inserted into the Win.iso. It simply needs to be in the same directory. Place both on the root.

Or

    Get Win ISO
    Rufus - run it
    Check all the necessary settings and install to a USB stick
    Rufus has all the bypass options: local account, bitlocker, etc.

Or

    Traditional Install

    For Local Account choose "Set up for work or school"

Or (If you want to complicate things)


    Disconnect Internet to avoid Microsoft account and allow local account.
        shift + f10
        netsh interface show interface
            shows wi-fi for example
        netsh interface set interface "wi-fi" admin=disable
        netsh interface set interface "wi-fi" admin=enable

    At the "Let's connect you to a network"
        I don't have internet
        Continue with limited setup
or
        shift + f10
        oobe\bypassnro
        reboot
            (Some say this no longer works - I just did it) (If not more options on bottom of this post)
            It looks like you are starting over but answer a couple questions.
        The new "Let's connect you to a network" has an added selection
            "I don't have internet"
    Now enter your name.
        Blank password (set later) avoids the three security questions.
    The options page
        No to everything
    "Hi"


1. Winget 
    go to "latest"
        download and install the 8wekyb3d8bbwe.msixbundle

    I haven't used this in some time.    
Open Powershell as Admin and type this:
irm christitus.com/win | iex
     Do Minimal or Standard  Tweaks
        Set Windows update to security only if updated to point you want
        grab some essential programs and/or run an apps.bat
           
        Bottom right of tweaks tab creates shortcut for Chris's script on desktop.

3. UniGetUI 
    download and install
        Or if winget is already installed . . .
                winget install -e --id MartiCliment.UniGetUI

4. New Windows Installs can benefit from Winget/Choco/Curl bat files.
        Simple to make and quick to install
winget install 7zip.7zip Notepad++.Notepad++
    save as name.bat and run it
or (The kitchen sink)
winget install 7zip.7zip
curl -O -L https://patchmypc.com/freeupdater/PatchMyPC.exe
choco install RocketDock -y
    save as name.bat and run it

    winget install -e --id=winaero.tweaker
    Eliminate "shortcut" labels
Right Click Context Menu
    Add "take ownership" to right click
    Add cmd as admin
    Add powershell as admin
    Add shutdown

6. Wintoys 
    winget install -e --id=9P8LTPGCBZXD
Open the tweaks section and turn off most things.
    If Chris Titus was used most will me done already.
        Check the other sections also.

7. RevoUninstaller remove Windows Apps
    winget install -e --id=RevoUninstaller.RevoUninstaller
    Portable do this:
    cd "%USERPROFILE%\Desktop"
    start https://www.revouninstaller.com/start-freeware-download-portable/
    It is also in PortableApps.com

At This Point You Can Drop Down To Activation Section


    Alternative Methods

Upgrading on Supported or Unsupported Hardware

Be sure version matches current language version ex. en-US, cmd admin "dism /online /get-intl"
Extract the ISO with 7zip
    cmd admin cd newwindows\sources
        run setupprep.exe /product server

Chris Titus Tech's MicroWin

I personally like Chris Titus Tech's MicroWin tool. 
    However, indexing options control was missing so, long term, it makes me wonder what else.
    But if you need a quick, effortless, clean install, this is it.

You can run it using PowerShell with this command:

iwr -useb https://christitus.com/win | iex
While I haven't tested a MicroWin on physical hardware yet, it worked very well in VirtualBox.
    Enter the user name you want during setup instead of the hassle of adding a user later.
    When modifying the win.iso it may stop after the "Could not remove package" messages so click the Powershell window and hit Enter. It should rapidly finish from that point.
    Negatives Found So Far
Indexing Options not accessible

Creating Your Own Unattended Installation

  1. Visit the Windows System Image Manager to create an unattended install file.
  2. For a detailed guide, watch this helpful video tutorial.

Important Note on Windows 11 24H2 (Maybe)

Windows 11 24H2 has introduced a new feature: Bitlocker is enabled by default during a clean install if you use a Microsoft account. I don't install using a Microsoft account but if it worries you . . .

Disabling Bitlocker During Installation

To prevent Bitlocker encryption during installation, you have two options:

  1. Using Rufus: This tool provides an option to disable Bitlocker during the installation process.

  2. Manual Registry Edit:

    • At the Region selection page, press Shift + F10
    • Open Task Manager
    • Run a new task: regedit
    • Navigate to Computer\HKEY_LOCAL_MACHINE\SYSTEM\CurrentControlSet\Control\BitLocker
    • Create a new DWORD (32-bit) value
    • Name it "PreventDeviceEncryption"
    • Set its value to 1
Activation
Crazy fast & permanent & can also change version
https://massgrave.dev/
Don't miss the Office install info. Works great.
My Office Deployment config file for Word & Excel install only is HERE
Idea for single command line if setup.exe is in a folder on D:
D: && cd "\Program Archive\Office Deployment" && setup.exe /configure configuration.xml
Modify to fit the location

Win11 Recall feature???
To check the state run as admin:
Dism /Online /Get-Featureinfo /Featurename:Recall

to disable:
Dism /Online /Disable-Feature /Featurename:Recall

to enable:
Dism /Online /Enable-Feature /FeatureName:Recall

Finish Below but More Software Info is HERE

Win + r sysdm.cpl > Advanced > Performance & turn off everything that moves.


Index Settings

Run Chris Titus Tool (Open PowerShell as admin "irm christitus.com/win | iex")

Might as will use Chris Titus to install . . . or use a .bat file
winget install 7zip, ShareX, Everything Search, Powertoys, TranslucentTB

UniGetUI (WingetUI)
    winget install -e --id=MartiCliment.UniGetUI
        Or from github

Wintoys
    winget install -e --id=9P8LTPGCBZXD
        If you did Chris Titus tweaks most will already be done but not all. 

RocketDock From MajorGeeks I just can't give it up. 
    For portable just copy installed program to portable folder and RevoUninstall RocketDock.
    Stack Docklet. Move it into Docklets Folder in RocketDock.

Symenu (I don't use anymore. The logon and program update failures are a pain)
Learn how to use PortableApp.com
    curl -O -L "https://www.ugmfree.it/Download/SyMenu/SyMenu.zip"
Open Symenu
[If v8 high def monitor has scaling problems, go to "Options>General>Do this for high def screens]
    Download:
PatchMyPC or from MajorGeeks. (I don't use anymore)
curl -O -L https://patchmypc.com/freeupdater/PatchMyPC.exe
LaunchyQT or from Github
curl -O -L "https://github.com/samsonwang/LaunchyQt/releases/download/v3.1.7/Launchy-3.1.7-win-x64.7z"
        UnigetUI gets it from Chocolatey and puts it in C:\Users\user_name\AppData\Local\UniGetUI\Chocolatey\lib
Win11 24H2 won't run LaunchyQt so just install original. I see little difference the way I use it.
    winget install CodeJelly.Launchy

Ultra Virus Killer (portable version)
        curl -O -L "https://www.carifred.com/uvk/UVKPortable.exe"
    Belongs on every repair drive and system. Updates itself on startup.
    Threat scanner gives a quick look at possible trouble.
    System Repair has loads of fixes & virus scanners
    User Manager is outstanding, clear and simple.
    Managers for Processes, Autoruns, Services all show Virus Total ratings
    WAU (Windows Update Manager) just works when Windows Update fails

May need Snappy Driver Origin if older PC. Get from Symenu or MajorGeeks.
    winget install -e --id=GlennDelahoy.SnappyDriverInstallerOrigin
    curl -O -L https://www.glenn.delahoy.com/downloads/sdio/SDIO_1.13.4.771.zip
        Start as admin and download index. 

If running in VirtualBox install Guest Additions and reboot to change display resolution.
The VM will be happy with 8 GB
On real PC 16 GB total RAM is enough but 32 is better. 

Windows Sandbox
Best way to practice with Winget is in the Windows Sandbox.
Currently an easy way to install Winget in the Sanbox is Chris Titus WinUtil and install UnigetUI.
    It will first install Winget. Using Chris's "Reinstall Winget" won't work. Maybe later it will.
        Also currently WinUtil won't install UnigetUI (maybe later)
This Guy created a Powershell script to download everything winget and install.
Download this ps1 and run it.
curl -O -L https://raw.githubusercontent.com/HarmVeenstra/Powershellisfun/refs/heads/main/Create%20a%20development%20Windows%20Sandbox/Install_WinGet_and_Software.ps1
    

Fixing Windows
    If you can run Windows:
Try an in place upgrade before trying reset. Open (mount) downloaded ISO and run setup.
Or move all the install files to a Win folder and run setup.exe from there.
    If Windows can't run:
You should be able to boot to USB installer and install onto the existing Windows drive without formatting. It should see the original installation and save it as windows.old.
Be careful with this. Important files should be backed up before trying this.

Lock Screen Overlay (If you have irritating junk on your lock screen)
HKEY_CURRENT_USER\Software\Microsoft\Windows\CurrentVersion\ContentDeliveryManager
Set the DWORD value SubscribedContent-338387Enabled to 0

Target for old Control Panel
C:\Windows\explorer.exe shell:::{26EE0668-A00A-44D7-9371-BEB064C98683}
* Or just use Windows search :)

Block Windows Telemetry With Hosts File
Grab the Windows "hosts" info
Find hosts file here: "C:\Windows\System32\drivers\etc\hosts"
Copy it to desktop. Change original to "hosts.bak"
Paste the info into desktop hosts file and copy to "C:\Windows\System32\drivers\etc\hosts"

Stop Windows from limiting bandwidth
I haven't seen any big internet speed difference but this is how to do it in Group Policy
I advise not doing it.
    gpedit.msc
    computer configuration
    admin template
    network
    qos packet scheduler
    enable
    set 0
    cmd
    gpupdate
 
If OOBE\BYPASSNRO Doesn't work:
shift + f10
oobe\bypassnro
or
OOBE\BYPASSNRO
or
%systemroot%\System32\oobe\BypassNRO.cmd

or

Step 1: Press the Ctrl + Shift + Esc keys together to open Task Manager.
Step 2: Click More Details.
Step 3: Go to the Processes tab, and find Network Connection Flow. Select it and click the End task button.

or

Shift + F10
taskkill /F /IM oobenetworkconnectionflow.exe

or

press the Alt + F4 keys at the same time on the Let’s connect you to a network screen. If successful, Windows 11 will skip the current screen and go to the next step.

At the OOBE screen, press Shift + F10 to open Command Prompt.
Type regedit and press Enter to open the Registry Editor.
Navigate to HKEY_LOCAL_MACHINE\SOFTWARE\Microsoft\Windows\CurrentVersion\OOBE.
Add a new DWORD (32-bit) Value named BypassNRO and set its value to 1.
Close the Registry Editor and restart your computer.

or

Step 1: Type net.exe user yourusername /add and press Enter.

Step 2: Type net.exe localgroup administrators yourusername /add and press Enter.

Step 3: Type cd oobe and hit Enter.

Step 4: Execute the command – msoobe.exe && shutdown.exe -r.

The PC will restart and follow the on-screen instructions to finish the setup with a local account, without an Internet connection.

Friday, September 8, 2023

Dell XPS Clean Windows Install

*Dang - after a couple weeks the screen turning off problem returned. So reboot is the only answer.
Still love the clean install but what the heck is this screen issue? I did put f.lux on recently . . .
- I haven't had a screen issue since uninstalling f.lux. F.lux may have been the bugger all along.
Nope, f.lux was not the problem. It's still happening. Reboot is the only temporary fix.

Finally sick of my Dell XPS 13 screen turning off for no reason . . . I did a clean install.
Wow, easy and what a difference. Just do it.

1. Download a copy of the Windows 10 media creation tool.
2. Select ‘Create installation for another PC and create an ISO. Drop it on to your USB Ventoy.
I didn't need to select Home or 64 bit and don't know why. But if you get the options select them. Home is the key tied to my Dell. Obviously if you have Pro choose that. Maybe I didn't uncheck the "this Pc" option.
3. Download the appropriate Wi-Fi driver and unzip it onto the USB drive.
(this was not needed, Windows 22H2 had it)
4. Reboot your laptop and load into the BIOS F2. Make sure the SSD is set to AHCI mode or the Windows installer won’t detect it. Dell has it set to RAID and don't think Windows has the RAID drivers.
5. Reboot and press F12 as soon as you see the Dell logo. I just press repeatedly.
6. Select USB in the boot menu and hit Enter.
7. Let the Windows installer boot and click Install Now.
8. Select Custom Install Windows. I delete all the partitions.
9. Follow the Windows installation wizard making choices as you go.
10. Once installed and onto the desktop, press Win+x then m for Device Manager. Don't panic if some drivers are not installed. Give Windows some time. It installed everything except one.

Something called "Base System" was marked as uninstalled. I wanted to avoid Dell installing crap so I went to Intel. It has a utility to install everything for it's chipsets called setupchipsets.exe and it took care of "Base System", whatever that is. This does not work on my HP PCs.

But what about all those special Dell drivers? I'm not missing anything yet and if I need something, I will go get it one at a time. 

Tip:
Remember to have local account no@thankyou.com, any password.
Blank password on local account to avoid all the security questions. Set password later.

Wednesday, June 15, 2022

Windows 11 On Unsupported PC

05-25-2025
Installing and upgrading
Using Rufus is probably easiest
Here is a new GitHub project (It will tell you if the correct elements are present.

28-10-2023
New upgrade procedure for unsupported hardware
Download Win11 version from here
Create Folder C:\Windows11
Mount ISO and copy all files to C:\Windows11
CMD as admin and run
c:\Windows11\setup.exe /product server
Proceed as normal

11-APR-2023
Windows Install (Make it easy)
Answer File (Make the file)
Anyburn (Insert the file into ISO)
In Symenu
Rufus (Set up the flash drive and bypass Windows restrictions)
In Symenu

WhyNotWin11 Will give info on what Win11 does not like about your PC
(Ventoy 1.0.86: bypass Windows 11 hardware and online account requirement enabled by default)

If you want to bypass by yourself . . .
* This may be the easiest way.
*** Be sure to have Windows Activation Key ***
cmd = wmic path softwareLicensingService get OA3xOriginalProductKey
(even though I forgot to get the key on a self built and activated PC and deleted I all the partitions during setup, Win11 install picked up the activation)
1. Download standard Win11 ISO
2. On Ventoy (or other) bootable USB paste the Win ISO
3. Also paste this into bypass.reg and place file on root of USB

Windows Registry Editor Version 5.00

[HKEY_LOCAL_MACHINE\SYSTEM\Setup\LabConfig]
"BypassTPMCheck"=dword:00000001
"BypassSecureBootCheck"=dword:00000001
"BypassRAMCheck"=dword:00000001
"BypassStorageCheck"=dword:00000001
"BypassCPUCheck"=dword:00000001
5. At Windows Setup screen, press Shift + F10 for command prompt
6. Type "regedit"
7. Import the bypass.reg file - or whatever name you gave it.
    (you may need to change directories ie cd .. a few times to find it)
8. PC name can not be same as user name so Remember Name-PC
9. Bypass MS account use email no@thankyou.com and any password
Check activation in cmd slmgr /xpr 

(Additional options below)
Install on unsupported PC
Rufus to make Windows install USB
(Rufus has this built in now)
Place bypass.reg in root
Start install
At "does not qualify" screen Shift +F10
Command Prompt loads
type notepad.exe
go to file>open change from txt to all files
on the bypass.reg right click and select merge
The registry now has bypass entry

Windows Registry Editor Version 5.00

[HKEY_LOCAL_MACHINE\SYSTEM\Setup\LabConfig
"BypassTPMCheck"=dword:00000001
"BypassSecureBootCheck"=dword:00000001

Upgrade on unsupported PC
On the PC you wish to upgrade go to Regedit
Computer\HKEY_LOCAL_MACHINE\SYSTEM\Setup\MoSetup
New>Dword(32-bit)Value
AllowUpgradesWithUnsupportedTPMOrCPU
1 Value data

Seems to me you may need only Win11.iso on drive for this to work.
Ventoy has built in bypass of all with this json file.
Change 0 to 1 in "VTOY_WIN11_BYPASS_CHECK"

{
"control": [
{ "VTOY_DEFAULT_MENU_MODE": "0" },
{ "VTOY_TREE_VIEW_MENU_STYLE": "0" },
{ "VTOY_FILT_DOT_UNDERSCORE_FILE": "1" },
{ "VTOY_SORT_CASE_SENSITIVE": "0" },
{ "VTOY_MAX_SEARCH_LEVEL": "max" },
{ "VTOY_DEFAULT_SEARCH_ROOT": "/ISO" },
{ "VTOY_MENU_TIMEOUT": "10" },
{ "VTOY_DEFAULT_IMAGE": "/ISO/debian_netinstall.iso" },
{ "VTOY_FILE_FLT_EFI": "1" },
{ "VTOY_DEFAULT_KBD_LAYOUT": "QWERTY_USA" },
{ "VTOY_WIN11_BYPASS_CHECK": "1" }
]
}


Local Account Setup
At sign in setup page
1. Disconnect internet
2. Press shift + F10 for command prompt
taskkill /F /IM oobenetworkconnectionflow.exe
or
F10
ipconfig /release
or
F10
oobe\bypassnro
or
select "I don't have internet"
or
Use the email address no@thankyou.com.
Type any password on the next screen.
Windows will display "Oops, something went wrong" on the next screen.
Clicking Next opens a screen that allows you to create a local account.

If you want to just upgrade 10 to 11 . . .
Or you could download a Win11 ISO, mount it and run setup. It will say your machine is not compatible but a new folder will be created in the registry.
Edit the registry and run setup again.


Sunday, June 12, 2022

Windows 11 To Go

 Not much to say yet except it works.

Start Rufus as Admin. There were a couple files it couldn't access during my process. I still worked but best practice I didn't think about.

The two I've done with Rufus I chose GPT so it only boots with UEFI. (see below)

I saw I video where selecting MBR will allow booting both ways. Need to try.

I stuck one on SATA in a Linux machine and dual boot with the F key. I do get an odd warning to "keep the USB device attached" that I don't get when actually booting from USB.

All the drives in the PC are accessible.

This may be a good way to run/install Win11 from an incompatible PC that refuses the standard bypass of TPM. Not sure that ever happens.

I think this is the way to make it bootable in both UEFI and Legacy but I neglected to do it.

AOMEI Partition Assistant claims ability to create WinToGo from a current system.
EaseUS also has a solution I guess.
WinToUSB may also be a good option.

When you first boot WinToGo it goes through setup which went fine over ethernet. 
On wifi it no driver. Even when I installed the driver it didn't work. 
Maybe when I get to an ethernet connection that will all clear up.


Sunday, December 15, 2019

Windows 7 Install To NVME SSD

I need to fine tune this description but . . .

Stuff you need:
1. This will insert USB 3 and NVME drivers into the Windows 7 ISO
https://www.gigabyte.com/Support/Utility/Motherboard?kw=windows+usb+installation+tool&p=1
This is for Gigabyte AMD boards. My board is Asus and yes Asus makes a version of this utility . . . and if anyone can figure out how to use it - let me know 😎

2. ImDisk Toolkit (If you don't have a thumb drive handy or want to speed things up) (hint: check the "removable media" box) (Or just use a flash drive and skip this step) It took 15 minutes on a RAM drive so good luck with a real thumb drive.

This Is An Outstanding Utility

You may wish to not install shortcuts and context menu items. Access ImDisk through control panel.

If flash drive is needed check "removable" otherwise leave unchecked.


3. ImgBurn (The driver insertion process extracts the ISO and you need to rebuild the ISO) (hint - etfsboot.com is the file to make the ISO bootable)

4. WinSetupFromUSB to create a multiple OS installation flash drive.
If you already have a multi boot flash drive with Win 7 install files, you can easily remove that file by deleting the setup files for Win 7 and editing the menu with Boot Ice. Then add the newly created version.

My NVME arrived today. Windows installed flawlessly. 😎😎😎
(If you don't count trying to find a Win7 LAN driver for a new motherboard. I had to use a USB WiFi dongle . . .)
I installed Win 7 first and updated so was stuck with MBR. Set BIOS to no UEFI.
Have only boot drive connected during install (old but true advice). You want the boot drive to be drive 0 in case you desire to convert to GPT later.
If installing 7 first or simply updating an existing Win7, you will have MBR. If you simply must have GPT for some reason - and your motherboard supports UEFI - Window 10 can convert MBR to GPT without data loss.


Why do I care?

Windows 7 is easily authenticated as genuine and updated to Windows 10.
If . . .
1. You have a product key sticker
...Remember to look inside the battery compartment 😎
2. Or use this crazy method.  (Which is phenomenal)
...Using this method - Once Win 10 gets authorized, create an image. I tried reinstalling and the key Win 10 was using would not allow reinstall. I had to do the whole Win 7 setup dance again. Could have been a fluke but an image would save time.
3. On the other hand . . .
. . . We could use
. . .slmgr scripts (which actually work!).
https://www.youtube.com/watch?v=0wkHPQicR6s&t=196s
Smgr scripts last for limited periods. Not sure about auto renew yet.

To check your activation type
Window Key + R
slmgr.vbs /dli
If you have use the slmgr method you will see a result like this . . .


If it shows a partial product key you are golden with life long authentication.

4. Alternatively you can install an Auto KMS like Windows Toolkit or FrostRose (kmspico). Be careful where you download. (Hint = kmspico for Office 10 "psw 2016)

5. Or just buy a cheap key for around $15.

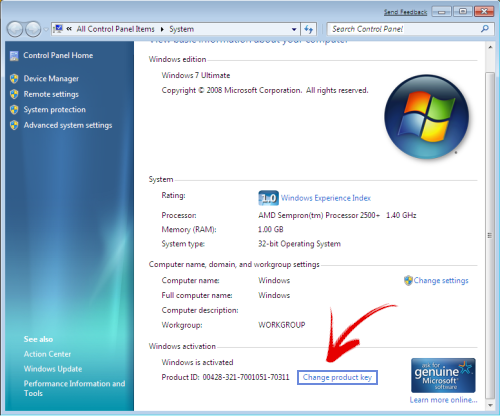
If  "Change Producy Key" is not showing . . .
C:\Windows\System32> slmgr.vbs -ipk "INSERT-YOUR-PRODUCT-KEY"

User folders on different drive. 
I resisted upgrading my existing PCs because I keep my user folders on drive D. Crazy thing I can't remember if Win 10 upgrade recognized that my user folders were on D: or if I needed to move the C: folders after upgrade. The good news is, it must have been no big deal or I would have remembered. I think Win 10 just recognizes your folders are not on C: and respects the setup.


Monday, November 25, 2019

Windows 10 Install

slmgr /xpr (shows if activated)
slmgr /dli (shows partial product key) (find full key in UVK system info)
slmgr /dlv (give more info on key)
wmic path softwareLicensingService get OA3xOriginalProductKey (this may read from BIOS so could be inaccurate if new version with different key is installed)
UKV (Ultra Virus Killer) under system info will show the key 
-or-
regedit Computer\HKEY_LOCAL_MACHINE\SOFTWARE\Microsoft\Windows NT\CurrentVersion\SoftwareProtectionPlatform (BackupProductKeyDefault)

Need an earlier version of Windows 10? Use this batch script.

Windows 10 from Windows 7
... Just Sayin' - After many flawless 7 to 10 upgrades, I have run into 3 no go machines. After several attempts at trouble shooting failed, here is my suggestion. Rejoice in the opportunity to do a clean install and call it a good day.
... Additional Install Info Here
First backup system with AOMEI Backupper.
AOMEI will ask for an email to enable download. I use yep@nope.com :) It will take anything.

Find and record your Windows product key.
*It may be on a sticker (best way)
* or try this https://nirsoft.net/utils/product_cd_key_viewer.html
(This should work because it reads the key stored in Windows registry)

Download Media Creation Tool
(Using a fresh version will diminish time for updating during install.)
https://www.microsoft.com/en-us/software-download/windows10
Start Media Creation Tool
Choose your flash drive as destination.
I never choose "use settings from this PC".

***I assume you have backed up all your data somewhere***
After completion you can start setup from the flash drive from within Windows 7.
This in-place upgrade works well but does not always work. Give it a shot.
If the in-place upgrade works you will not have to worry about the product key.
(A clean install is always preferable but don't fret over not doing the clean install. You can always do it later, once the authentication has been established.)
I boot from the created flash drive and run setup.exe.
For in-place upgrade things will be automatic.

If doing clean install:
*** Make certain only ONE hard drive is connected. ***
Choose "I don't have a product key".
Choose the version that matches your previously authorized version for which you have a key..
Choose "Custom Install"
Delete the partitions of your old Windows install.
Choose "Next" on the newly unallocated space.
Bingo - Installing Windows

LoL - Now we have some important setup to do . . . or so it says. Windows does it all.
After all that important work is done . . .
Create an off line account (the fine print at the bottom left)
No harm in using your MS account but I don't do it.
Now say "NO" to everything . . . or not
Now Wait until the system pops up.
No need to hurry authenticating but nice to know if it works.
Right Click on My PC
Click "Change My Product Key" lower right.
Copy/Paste the key into the dialog box - or type it :)
Good work. You are in a happy place.

You may (or not) wish to move user folders to D drive.
You may wish to "shut up" Windows 10
https://www.oo-software.com/en/shutup10
You may want to debloat Windows 10
http://bighugethingcomputing.blogspot.com/2019/04/windows-10-debloat.html

Windows 10 versions:
I have not had any problems with any version of Windows 10 but many people have. If you need to create (download) a specific version - try this https://pastebin.com/bBw0Avc4

This is an example of running the bat file

You may wish to delay feature updates. These are the big time updates which people find problematic. Pro versions allow long delays but the Home versions are much more limited in allowing the delay. Setting a metered download option is said to avoid feature updates in the Home versions.


Once you have a working system, back it up with AOMEI Backupper. It will ask for an email. I normally use yep@nope.com :) It will take anything.

Bonus info: Your entire old Windows system is saved on the boot drive as "Windows old" folder in case Windows needs to revert to the old system.. It is big and you will want to eventually delete the folder but don't hurry in case you need to revert. Use Windows own "Disk Clean-up" to remove the file. You can't simply delete it in a standard way.

Right Click on the boot drive:

Monday, October 22, 2018

WinSetupFromUSB The Multi Windows Install Program

Find it here:
http://www.winsetupfromusb.com/

Install Win7, Win10, etc from the same USB drive.

When starting from the USB, it can be tricky to choose the correct boot option on some PCs but just try all options.

I don't mean boot options in the BIOS but picking the selections the drive offers. Be aware that a UEFI option is sometimes given as well as the regular option so try both.

Saturday, March 24, 2018

Use PowerShell to Create a Bootable USB Drive

Use PowerShell to Create a Bootable USB Drive: $Results = Get-Disk | Where-Object BusType -eq USB | Out-GridView -Title 'Select USB Drive to Format' -OutputMode Single | Clear-Disk -RemoveData -RemoveOEM -Confirm:$false -PassThru | New-Partition -UseMaximumSize -IsActive -AssignDriveLetter | Format-Volume -FileSystem FAT32 $Volumes = (Get-Volume).Where({$_.DriveLetter}).DriveLetter Mount-DiskImage -ImagePath C:\ISO\Windows.ISO $ISO = (Compare-Object -ReferenceObject $Volumes -DifferenceObject (Get-Volume).Where({$_.DriveLetter}).DriveLetter).InputObject Set-Location -Path "$($ISO):\boot" bootsect.exe /nt60 "$($Results.DriveLetter):" Copy-Item -Path "$($ISO):\*" -Destination "$($Results.DriveLetter):" -Recurse -Verbose

Monday, March 5, 2018

Multiple Windows Install Versions Plus Linux

WinSetupFromUSB

This creates a bootable USB. It handled Windows 7 + Windows 10 and Linux Mint 18.3.
I suppose it will accommodate other Linux live systems also. You need to select FAT32 for UEFI bios installs. I normally used Yumi for multiboot but it can't accommodate multiple Windows installs.

I also like the test boot function with QEMU.

I did add advanced setting to use custom names for Windows boots . . .

I tried "syslinux" but it didn't seem to work so had to redo with linux ISO option. I probably don't understand how to use the syslinux option.


Wednesday, June 14, 2017

Window 7 SP2?

I am totally sick of running WSUS on new installs of Windows 7.
Yes I had SP1 slipstreamed into the install but we are way beyond that.
How-To-Geek has a fantastic tutorial for integrating the rollups to make things more current.
You can follow his instructions verbatim to make a more current Win7-Install.iso.

One hickup at the end:
I was on a Windows 10 machine so "Deployment Tools Command Prompt" was not listed in the Start Menu (at least I couldn't find it). I used EverythingSearch to find it. It was on the machine but the AIK programs were not listed on the Start Menu.

Another way of doing this is here. It involves using NTLite, which I have never been that fond of, but I'm sure it works fine.

If you are reinstalling Windows, back up the drivers with Double Driver. Symenu has it but easy to get it elsewhere.

Wednesday, March 8, 2017

Windows 7 Install

** Why do I care about user folders? I have always kept user folders separated from the operating system. MS warns not to do this but I have never had a problem. I don't "upgrade" the OS. I do a clean install. Recently, on two different PCs, I have had "save" commands slow to find the save location. This is irritating enough to make me rethink my user folder structure.

*** If you are moving user folders . . . Remember to make a user name folder and don't just dump the folders under "Users". Moving the filled folders into a user name when they are full of files is painfully slow.

 **** (In other words it is D:\Users\George\My Documents . . . not . . . D:\Users\My Documents). Microsoft advises to not move the User folders. This may be a better way to handle the issue. Leave the user folders in place but add a shortcut in that folder to a mirror folder on another partition or drive. Manually move files periodically and keep the original folder empty. We no longer worry about the number of writes to an SSD. We are concerned about the size in most cases. This would also allow for a relatively small backup image and/or OS reinstall with minimal data rescue.

***** If you have found yourself in the dilemma requiring copying or moving huge numbers of files, forget using MS copy. Give FastCopy a try. Or use RichCopy.

Check out the Windows SP2 Post.
https://bighugethingcomputing.blogspot.com/2017/06/window-7-sp2.html

If you are reinstalling Windows, back up the drivers with Double Driver. Symenu has it but easy to get it elsewhere. Double Driver is no longer supported but still works. Driver Backup may be a better choice.

Windows 7 Download is here. Check hash with SVF Ninja available in Symenu.
(Windows 10 use this)
Burn the image to DVD with Image Burn
or
Make USB Stick with Rufus (Win10 does this on its own.)
Install Windows
Buy key from here
https://www.kinguin.net/category/13816/windows-7-professional-oem-key-sp1/
or
Authorize with DAZ 2.2 (Be careful where you get it.) (For Win10 use Toolkit)
Windows 10 runs fine without authorization. A few personalization settings are disabled but some of these can be adjusted with third party programs.
Turn off Windows Update (just until you get updated offline)
WSUS Offline Update (much faster)
http://download.wsusoffline.net/ (Update and run) (Include Security Essentials and NetFramework).
If you have a small drive, omit NetFramework)
Turn Windows Update back on (Run to finalize updates) (Set as notify only)
Download Snappy Driver to update drivers. (This thing is a life saver.)
Do system tweaks as normal.

If SSD Boot drive make these directories (copy/paste the names). A quick way to get the folder names is to open a cmd prompt, nav to the user / name directory and type dir > print.txt. A text file with the names will be in the directory.

*** If you are moving user folders . . . Remember to make a user name folder and don't just dump the folders under "Users". Moving the filled folders into a user name when they are full of files is painfully slow. * * *
Then move each from C: to D:.by right click "move"
It is easier to copy the folder structure first with no files.
You can use Tree Copy
or
Use Command Prompt with quotes I think? (xcopy /t /e "C:\Users\Your Name" "D:\Users")
You will be asked if files or directories - directory is the right answer.
Here is a partial list but I move them all.
D:\Users\Your Name
Desktop
Documents
Downloads
Music
Pictures
Videos

The file structure will look something like this:


Install Tweak SSD and run it. Don't worry about trim because Windows should handle it.
Here is an interesting article about not obsessing over SSD tweaking. I have always moved user folders off the OS drive. It makes reinstall or image restore easy and SSD drives are still cheaper if smaller.

Download Aomei Backupper and image C drive.

I always add:
Launchy
Everything Search
Rainmeter
Rocket Dock
SyMenu with the following:
7-Zip_(x64)_sps
CCleaner_Portable_sps
ClipX_sps
Core_Temp_(x64)_sps
CPU-Z_sps
CrystalDiskInfo_Portable_sps
CrystalDiskMark_Portable_sps
DoubleKiller_sps
FastCopy_(x64)_sps
FileZilla_sps
Homedale_sps
HWinFO64_sps
HWMonitor_sps
ImgBurn_sps
MobaLiveCD_sps
Network_Stuff_sps
NexusFont_sps
RegSeeker_sps
Revo_Uninstaller_sps
Rufus_sps
SpaceSniffer_sps
Speccy_sps
TeamViewer_sps (I have Anydesk installed for personal machines.)
Tixati_sps
UltraSearch_(x64)_sps
Universal_Extractor_2_sps (This one is a pain. I use version 1.)
Universal_Extractor_sps
Unlocker_sps
Win32_Disk_Imager_sps
WinCDEmu_sps
WinDirStat_sps
WizTree_sps
And several Nirsoft and Sysinternals programs

BitLocker

BitLocker: How to Protect Yourself Even If You Don’t Use It Many Windows users (including me) run local accounts and never intentionally ...