Get it here
https://cresstone.com/apps/shellNewSettings/
Saturday, January 11, 2020
Clear Print Spooler - Buffer
Oddly I have had to do this a couple times lately. Easy to find when searching but documenting it anyway.
net stop spooler
del %systemroot%\System32\spool\printers\* /Q /F /S
net start spooler
Thursday, January 9, 2020
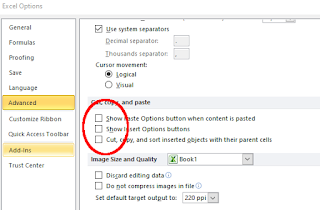
Excel Hide or display the Paste Options button
This little thing drove me crazy. It was often in the way Please don't help.
 Go to File > Options > Advance and uncheck the boxes

Thursday, January 2, 2020
Syncthing - A Try Explaining Setup -
* If I have 2 or more drives, I put the Syncthing folder on C and auto backup to D.
The folder contains files I want to access from or transfer to the Mother Ship.
... Install it.
(I'm no expert but I get it working.)
If you run multiple PCs, this is a great way to move files back and forth or make files available to all devices. I still use Mega, Dropbox, etc for a few regular items but Syncthing is awesome and under your complete control.
(Very little seems intuitive for a Syncthing novice. Don't worry because everything can be changed)
1. A default folder will be created, probably inside your user folder. You will likely end up deleting this folder.
... Two items are called folders. One is the actual folder within the Windows file structure. This we are accustomed to seeing and using. The other is the folder designation within the Syncthing interface which contains the path to the folder within Windows, the folder ID#, and folder name. The Syncthing folder designation's name can be the same name as the Windows folder or not. Syncthing does not actually use the name to identify the folder nor does the remote device care about the name. Syncthing devices use the path and the folder ID#. This number must be the same as the folder number on the remote or base devices syncing files. Syncthing remote devices do not care about the path on the local device. The local device handles the path. (Wow - That was a mouth full.)
2. Add a folder and call it Syncthing (or whatever). I see no reason to name the folder within the Syncthing interface differently than the actual folder name in the operating system. You could leave the default but I don't want the folder in my user folder and being backed up. I use D:\Syncthing
3. Use this same procedure on each computer all with the same folder name. Unless some special case you will have only one folder on each PC. Be careful to note the original folder ID# when setting up the base device because the remote folders need to be the same number. You can insert this number when setting up a folder but not change it after setup (that I can find). You can always delete the folder and set up a new one. Remember, I'm talking two setups. One, you make an actual Windows folder and . . . Two, setting up that folder withing Syncthing.
... It may sound like I am being too paranoid about the folder thing but it is the trickiest part of setting up Syncthing. Like most things, after doing it a few time there is no mystery to it.
4. Name the device something descriptive for PC.
... This device has a name entry on the remote machine also. The name has nothing to do with the connection. I keep the names consistent but it's not required. Like folder names, device names are cosmetic conveniences for the user and Syncthing ignores them.
... Example: Let's say one PC's device name is MotherShip and two remote PC's are named UFO1 and UFO2. MotherShip will add two devices named UFO1 and 2 respectively. MotherShip will have 2 added devices but UFO1 and 2 will only have MotherShip as an added device.
5. Access the ID# to add devices to the PCs . . . The names mean nothing. The ID is the important thing.

... This needs to be entered into the remote PC.
... You need the remote PC's ID# entered into base PC.
... The folders all need to have the same ID#

6. Edit the device and folder. You will see a share tab. Activate the folder share.
... It is now you will see the original folder and the new one you made. Verify where the original fold resides. Delete it if you wish.
This may get confusing but . . .
... I use a Base PC with one Syncthing folder.
... Each remote PC has only one Syncthing folder
... Each remote PC links only to the Base PC but the Base links to all the others.
Entering or removing anything from any syncthing folder adds or deletes it from all folders.
The easiest way to handle this is . . .
. . . Install Anydesk on the MotherShip (which may usually be always turned on)
. . . Enter MotherShip ID as added device on UFO1
. . . Log on to MotherShip and accept device request and share Syncthing folder.
. . . On UFO1 reject offer to add share folder because you are going to direct to Syncthing folder.
. . . Syncing may not start immediately for some reason but it should fire up eventually.
If you want to sync a second folder from any PC to the Base just create a second folder (Syncthing_Accounting) on the Base and share it with the Remote PC. The same will need to be done on the remote. Just make sure the folder and files on the Remote are not originals with no backup. If you remove the files from the Base the Remote will lose the files. For instance, if the remote has accounting files the originals must be backup up into a sync folder share.
* * * I had one remote PC (ie not base MotherShip) that I hadn't used for awhile. I didn't like the share folder name and where it was located. I changed it. It wouldn't sync. The problem was the folder ID#. The folder ID must be the same on both PCs. You would not want to change the MotherShip folder ID because it shares with other computers. And I find no way to change an existing folder's ID. So delete the remote folder. When creating the new folder, the ID# from the MotherShip folder can be entered into the remote PC's folder.
... I must say, this is a relief. I'm quite taken with Syncthing and it had me totally stumped for a few hours.
My Attempt At Simplifying My Folder Explanation
SyncTrayzor is the download to grab for Windows.
... Don't install it yet.
... Think of where you want the share folder and what to call it.
I call mine "Syncthing" and put it in C:\Syncthing or D:\Syncthing
... Now install SyncTrayzor
A folder will be automatically created in the Windows user folder.
The folder will be named with it's Syncthing folder ID#. Something like 3q76f-f7lkk
... Feel free to delete the folder because we will add a folder in Syncthing and point to the one you made in Windows. Add the correct path and enter a name "Syncthing" maybe
... If this is the base machine, remember the folder ID#. All the shared folders need the same ID# to link the folders on different devices. ...
Hint: After you create a folder on the Base PC and share with the remote, the remote PC will show an offer from the Base PC to make and keep that folder. Before you reject the offer, copy the folder ID#. When you make the folder where you want it, paste in the ID, create the path to the pre-made folder and name it appropriately.
(Yet to get a handle on - I have done the above procedure and not had to worry about the folder ID#. One would think the folder ID would always require manual entry into the remote new folder to match the base PC's folder. Happily, once Syncthing is set up, no changes need to me made so this will remain a mystery until a future setup.)
Moving User Folders
Another thing I don't want to look up AGAIN . . .
This is normally only a problem if you are upgrading to Windows 10.
I usually move some of the user folders to D:\Users\MyName\Pictures (for example)
This often works fine but sometimes Windows will not recognize the location exists or it insists that Pictures is My Pictures. This is because the previous system had something else registered in the folder's desktop.ini.
Find the desktop.ini in your target folder and delete it. The easiest way to find this file is with Everything Search. Showing hidden files in explorer doesn't seem to do it for me.
You may need to restart but the problem will be gone.
Wednesday, January 1, 2020
Slow Context Menu Load Right Click On Desktop
My slowly loading context menu when right clicking the desktop on my X1 Carbon finally irritated me sufficiently to search for a fix. Here is the solution.
Simply grab ShellExView from Nirsoft and disable the graphics properties options added.
Simply grab ShellExView from Nirsoft and disable the graphics properties options added.
Subscribe to:
Posts (Atom)
Pin Not Available
Crazy Error I had not seen before. Pin not available blah blah. I restarted a few times and it finally worked. If it doesn't some say to...
